Friday, December 27, 2013

Nightmare Before Christmas Man-Eating Wreath Tutorial

Here is a tutorial on how to make the scary "Man-Eating Wreath" as seen in Nightmare Before Christmas Disneyland's Haunted Mansion. As you can see , the Disneyland version and the film version differ in some ways. I chose to make mine a sort-of hybrid. The great part about this prop is that it is fairly simple to make. Also,  you can make it as big or as small as you would like .


Supplies Needed:          
Wreath 
2 strands of wired garland - 6ft
2 plastic spoons
Scrap foam core board -white
Red Christmas bow
Red holly berries
Hot glue 
Acrylic Paint- yellow & black
Scissors / X-acto blade 

NOTE: It is way more cost effective to buy all of your supplies the day after Christmas. I did, and got everything for 50% off or more .
And always Shop .99 cent Store & Dollar Tree First.

Total Cost: $10

Time Invested: 2 Hours


Detailed tutorial corresponds with picture Tutorial above:


1. Buy wreath and garland. 
I found my wreath at the day after Christmas clearance sale at Biglots for $6. It is a good size at 18 inches in diameter. I got the garland at the .99 Cent Store day after Christmas sale for .50 each. They measure approx 6 feet each and have a heavy gauge wire running through them. The wire makes it easy to pose the tentacle arms with out having to suspend them with hooks and strings,

2. Remove any unneeded decorative items the wreath may have come with. Fuff and shape your wreath to the desired fullness and shape.

3. Flip your wreath over. 
You want the front facing down. Unravel the garland and twist the two strands together near the center so they become one piece.

4. Make a slight bend in your garland and shape it to the wreath.
 With the wreath still face down: You want the garland to extend across the wreath and stick out like tentacle arms, but not show through the mouth opening of the wreath.

5. Secure the garland to the wreath.
With the wreath still face down: Use some of the wreaths wire branches to twist tightly around the garland. I have highlighted the garland in lime green, and where it is secured to the wreath with red.

Flip wreath back over and complete the project with the wreath face up:

6. Measure & Make the teeth.
Lay the wreath's mouth opening on a piece of Dollar Tree white foam core board. Draw the size and shape of the teeth.

7. Remove the wreath and cut out the teeth shapes with an exacto blade. 
Peel off the papery layer because its pretty much going to peel off anyway. You will be left with the soft white foam core. 

8. Make the eyes.
Use two plastic disposable spoons for the eyes. They are the perfect shape for the Disneyland version. Cut the handles from the spoons with sharp scissors.

9. Glue in the teeth.
Use hot glue to glue the teeth into the "mouth" of the wreath. 

10. Attach a red Christmas bow.
I found this bow in the Dollar Tree clearance for .50 cents. It came with a twisty-tie attachment on the back.

11. Paint Eyes.
Using acrylic craft paints, paint the eyes yellow. After it dries, use black acrylic paint for the "eyeliner" and black pupils.

12. Attach eyes with hot glue .

13. Attach assorted holly berries with hot glue .
I found the whole bundle of holly berries in the Dollar Tree clearance for .50 cents

Lastly, Arrange and bend the tips of the garland to look like out-stretched fingers 

Finished! Please comment if you have any comments or questions. Thank You.
Good Luck


Thursday, December 19, 2013

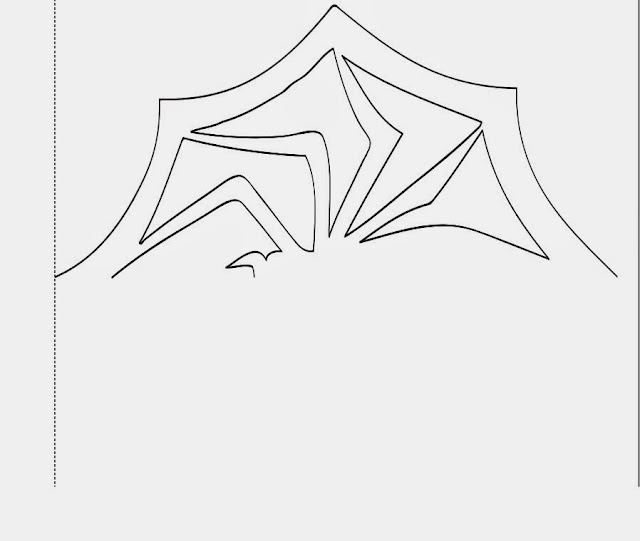
Jack Skellington's Spider Snowflake Tutotial

Just in time for Christmas! 
Here is a tutorial on how to make the spiderweb snowflake that Jack makes in the movie
 Nightmare Before Christmas.

Here is the actual screen used snowflake cut by Jack in the filming of Nightmare Before Christmas.
It sold at auction for $700+ back in 2009

As you can see, this snowflake is not symmetrical on both sides and therefore, if you want it to be exactly, completely accurate, you will have to use the above picture as a template and cut it out with an xacto blade.

However, If you do not have the time to precisely notch each detail out with a blade, there is hope.
Penolopy Bulnick has made a symmetrical version of the spiderweb snowflake that can easily be cut out with scissors. She was even nice enough to create a free PDF printable:


Tuesday, November 26, 2013

Nightmare Before Christmas Scary Vampire Teddy Toy Tutorial

Hey everyone! I'm back with a new tutorial. 

I just finished Scary Teddy last night. He is one of the toys made by the citizens of Halloween Town during the "Making Christmas" song. He is later given as a gift to a child in the "real world" and chaos ensues.


Materials Needed:
-Pink Insulation Foam
-Saw/knife/scissors/foam cutter
-Fine grit sand paper
-Caulking
-Paper towels or soft tubing
-1 yard cheap black fabric
-1 Sheet or section of white felt
-Acrylic Paints/brushes
-Hot Glue/Wood Glue
-Wooden dowel
-White colored pencil
-Wire Spool: 20 gauge


Scary Vampire Teddy Head Construction Tutorial
(Detailed description corresponds with picture tutorial above)

1a. Use reference photos to get accurate details, scale, and measurements.

1b. Make or Buy a round foam head.
(I could have bought a foam ball, but I had tons of pink foam just laying around so I figured I might as well  use it. I used 3 squares of pink foam, stacked and glued them together into a 6"x6" cube . Then once it dried I used a kitchen knife to shave off all the edges until it formed a ball.)

2. Notch out a wedge shaped mouth area with a knife .

3a. Cut out small ear pieces. Glue them to the head.
(You can use toothpicks to help them stay in place as they dry)

3b. Draw out with pen the placement of the eyes, nose, and widows peak.

4. Cut a small "dot" of foam for the raised nose, and glue into place.

5. Use some sort of flexible tubing for his lips.
(I did not want to spend any money, so I used rolled up paper towels dowsed is white glue. I blow dried them until they were tacky, then applied them to his mouth. Once they fully dried, they hardened and were very strong).

6. Use an exacto blade to notch, cut, and shave out the details of his eyes and widows peak

7. Pace paper up against the mouth and mark the shape of the mouth opening as best as you can. from that draw teeth that will fit in that opening. dry fit the paper teeth into the mouth. this is a tryal and error process. Once you get a good set that fit perfectly, they can be used as the paper template to cut the foam teeth later.


(Detailed description corresponds with picture tutorial above)

1a. Use reference photos to get accurate details, scale, and measurements.  

1b. Sand with fine grit sand paper. Patch any holes, seams, and gaps with caulking
(oops, ear fell off)

HEAD
2. Paint the head with a all over white coat of acrylic ( may need two or three coats for nice full coverage.

3. Paint the black details ( ears, widow’s peak/head, pupils, nose, inner mouth)

4. Paint lips red

5a. Paint eyes with a yellow wash. Paint a little darker yellow at the outer edges and blend to a lighter yellow toward the center.

5b. Using white acrylic paint on a thin, small brush, dry brush white dash lines all over the ears and black part of the head (see photos for reference)

TEETH
6. Cut out the teeth out of a thin sheet of craft foam and hot glue into place. Use the paper template you made earlier as a guide.

BODY
7. Take a piece of insulation foam and draw the body shape on it, place the head nearby to use for scale.

8. Cut out the body out of pink insulation foam.

9. Slice off the harsh, hard edges of the foam to form nice rounded smooth edges of the body. Sand hands and feet with fine grit sand paper.

10. Dry fit the head onto the neck area, shave the neck down accordingly, until the head sits on the neck/shoulders perfectly.

11. Paint hands and feet white

CLOTHING
12. Front: Lay the body on black material. Trace the body shape with white color pencil. Cut it out about and inch or so outside the white markings.

13. Back: Repeat step 12 for other side of clothing, but cut it out about 2-3 inches out side of the white markings.

14. Back: Cut small slits at the armpits and hips to make the material easier to wrap around the body.

15a. Lay the larger (back) piece of material down. (make sure white trace lines are facing in).

15b. Lay the body face up on the material.

15c. Fold the material up and wrap it forward around the body, glue into place.

16a. Place the smaller (front) piece of material on top of the body (make sure white trace lines are facing in).

16b. Fold the material down and wrap it back around the body, glue into place.

17. Trim off any excess material to expose white hands and feet.

18. Use white color pencil do draw on lines/stripes all over the clothing.

ATTACH PIECES
19. Use drill/bit to drill a whole into the neck and bottom of head.

20. Pour wood glue into each hole, and insert a dowel. This will hold the head and body together.

ACCESSORIES
21. Add a collar out of black material, and white, round buttons cut from felt. Hot glue into place.

CAPE
22. Cut the cape shape out of black material. Leave and extra half inch on all edges to fold over the thin guage wire.  Line the left, right and bottom of the cape with the wire so it can be flexible and look like it’s flying behind him. Leave two inches of wire sticking out at the neck area (left and right) of the cape so it can be pushed into the neck and secured.

23. Use white color pencil to make white marks/stripes all over cape.
(The side that has the folded and glued edges is the bottom or underside. Flip it over and put the pencil stripes on the opposite side- top side)

24. Shove the extra wire you left at the top of the cape into the bottom of the head at the neck. Run a line of hot glue on the underside where the cape material meets the back collar for extra strength. The cape should be posable and look like its blowing in the wind, not hanging limp behind him.

25. DONE


Comment if you have any questions or comments
Good Luck . . .


Thursday, November 14, 2013

Nightmare Before Christmas Prop Skulls for YOU...Available Now


I was able to make a mold from my original NBC skull. If any one is interested in purchasing some replicas, please visit:


THANKS

It is a replica of the front half of a skull used in Disneyland Park on the iconic Haunted Mansion.
The facial details are an exact 1:1 replica, as far as dimensions. It has been cut in half, losing the weight and bulkiness of the back, making it ideal for hanging and decorating.

Dimensions:
6.25" L x 5.5" W x 2.25" D / Weight: 14 to 16 oz.

First Casting:

Sunday, November 3, 2013

Coming Soon... Scary Teddy Vampire Toy Tutorial ...And More

This is one of the props I'm working on now, check back for more !

Scary Teddy


Other NBC Props in progress or slated to start 2013/2014:
-Lock
-Shock
-Skeleton Gingerbread Men
-Christmas Tree-Eating Snake (orange and black)
-Man-eating Poinsettia plants
-Jack's Sandy Claws Naughty & Nice List
-"Seasons Screaming" gift tag (as seen on Haunted Mansion)
-Sally's Pick-nick Basket
-Scary Toy: Russian Nesting Doll
-Cat and Fish bone Gift Box (as seen on Haunted Mansion)
-NBC Fence and Finials with Pumpkins
-Bone Garland
-Oogie Boogie
-Jacks' Laboratory Specimen Jars
-Skeleton Reign Deer?

Please leave a comment if there is a specific prop you would like to see made


Sunday, October 6, 2013

Nightmare Before Christmas—Oogie Boogie's dice printable

DIY Video
print out credit : @MUCHprops
OR
Oogie Boogie's dice printable from Disney

Print out the images onto a card stock. Cut out the two images and fold inward, the white side is the inside of the cube. Glue the tabs to the inside of the dice to hold it together.  To add weight to your dice, tape or glue a penny to the white side of each dice, or place a cube of pink insulation foam inside the dice to help hold its shape. Use black acrylic paint on any white paper showing through on the edges for a more realistic look.


Dimensions: 
Height: 1.1"
Width: 1.1"
Depth: 1.1"

Difficulty Level: 1


SAMPLE:


Monday, September 30, 2013

Ultimate Nightmare Before Christmas Prop Gift

I recently received the ultimate Nightmare Before Christmas prop as a gift...

It is an actual, full-sized NBC skull, that came directly off of the 2011 Haunted Mansion Holiday from Disneyland Park, Anaheim, California.

In 2012, I believe the tons of  NBC skulls that covered the Mansion, inside and out, were replaced with new ones, and the old ones were auctioned off individually. The new ones are painted differently, with more black around the eye and nose area.

As a HUGE Disneyland aficionado and NBC fan, I freaked when I opened it.

Behold the beauty......


amazing...


Nightmare Before Christmas Wrapping Paper DIY Tutorial


This is a tutorial on how to make your own Nightmare Before Christmas gift wrapping paper. It can be used for NBC prop making, or actual gift wrap for a huge NBC fan!

This creepy paper is made famous in the attic scene of the Haunted Mansion Holiday at Disneyland Park in California:


There is an easy part and a hard part to making this.

1 . The easy part is the wrapping papers are all pre-made by a great special effects artist Tim Baker. He has made these digital papers available FREE online here:
 http://timbakerfx.deviantart.com/gallery/?catpath=%2F&q=nightmare


SAMPLE PAPER

SAMPLE PAPER RIBBON


2 . The Hard Part is you need to print these out yourself. If you want to print out large scale paper, you will need to have access to a large scale printer, such as Fedex/Kinkos, or other copy shops, which can be pricey.
(I happen to know someone that owns a large scale printer, so I lucked out)

My presents:

Black and White Paper Conversion as requested
Click image to enlarge


Monday, June 17, 2013

Nightmare Before Christmas Barrel Prop Tutorial

Here is a tutorial on how to make a life size Barrel from the movie. He is one of the three trick-or-treater kids /Oogie's henchmen: Lock, Shock & Barrel.


Supplies Needed:

-Pink insulation foam (2" thick)
-Carving supplies
-Cheap pool noodles (Dollar Tree/.99 Store)
-1 Yard grey fleece fabric 
1 Sheet white felt (8.5"x 11")
-2 plastic Easter eggs
-Acrylic paints
-Hot glue
-Plastic toy lollipop (Dollar Tree toy section)


*Optional: Alternate version uses a foam-core poster board (Dollar Tree).


(Detailed tutorial corresponds with the picture tutorial above)

Face Mask:
1.  Cut a 9.5" diameter disc out of insulation foam. I used a plate as a template .

2. Use a knife or carving tools to shave off the harsh edges, to create a dome shape .

3. Use a fine Grit sand paper to sand and smooth the disc shape .

4. Using a photo for reference, trace the features of Barrel's mask lightly with a pencil.

5. Use an exacto blade to carve and cut out the features of the mask (eyes, nose and mouth).

6. Take the bottom (wider end) of two plastic Easter eggs. Twist and press them into the mask's eye sockets.

7. Prime : Use a grey primer to coat the entire mask.

8. Paint : Using acrylic paints, paint the mask white . Add black accents to the eye sockets, nose and mouth. Add off-white color to the teeth and eyeballs. 

9.  Dip a nice pencil eraser into some black paint to make a perfect stamp for the eye pupils. Optional : Add a acrylic gloss varnish to the eyeballs for "wet", life-like eyes. The Mask is done .

Hands, feet and Lollipop:
10. Feet : Cut two horseshoe shapes out of insulation foam. Notch out two triangle shapes out of each. Using an exacto blade , shave off the harsh edges, for a rounder, softer top. Using a fine grit sand paper, sand and smooth the feet. Prime and then paint the feet using a green color.
Hands : I carved the hands out of insulation foam. Then primed and painted the hands using a green color. (I forgot to take progress photos of this, sorry).

11. Lollipop : I found a plastic lollipop toy in the toy section of Dollar Tree . Try to find one there . Re-paint it with black and red acrylic paints. (If you can't find one , make your own out of a thin insulation foam disc and a wooden dowel stick)

Body Assembly: Here is the tricky part to explain...
12. Cut Barrels body shape out of a solid piece of insulation foam. The insulation foam body continues up behind the bottom half of the mask to support it. There are no photos shown of this. (*Alternate version uses a foam-core poster board (Dollar Tree). I did use a foam-core poster board as a backing for the majority of his body. Due to the fact that I only had scraps of insulation foam left. I wanted to use up my scraps. I pieced them together and secured them to the foam-core . Ideally, I would have cut his body out of one solid piece of insulation foam.) Slice cheap pool noodles in half vertically, use them for Barrel's arms and legs. Secure all the pieces together. I happened to use screws, but you could use glue or caulk . Side note : Hot glue will melt insulation foam and not stick...

Clothing/Costume:
13. Wrap body with grey fleece fabric. Measure , Cut and fit material onto body. Secure it with glue or pins. Hot glue works well on the fleece . (One yard was only $2.99 at Joanne's Fabrics with coupon).

Head/Hair & Ears:
14. Hair : Since Barrel wears a mask, his real head and face are supposed to be behind the mask. I used a segment of a pool noodle to make the top of his head. I bent it in to a horseshoe shape and screwed it to the back of the mask. (Use short screws so you don't poke through the front of the mask and ruin it). Cut and tear the surface of the noodle with scissor cuts to make the illusion of his claymation hair. 
Ears : Cut the ears out of insulation foam.  Secure them to the back/sides of the mask with caulk or short screws.

15. Paint the hair with a black primer, and then a dry brushing of olive and army greens (use photo for reference). Paint the ears with white acrylic paint, use a grey/black to shadow the inside of the ear.

Bones:
16. Measure and draw the bone shapes for Barrel's costume . Use a black Sharpie marker on white felt. Cut them out with scissors. Hot glue them onto the clothing. (Use a photo for size and placement reference)

Now you should be done ...Please comment if you have any questions.  Good Luck...


Sunday, June 2, 2013

Nightmare Before Christmas Sally Prop Tutorial

This is a tutorial on how to make a life-size Sally the rag doll from Nightmare Before Christmas.

MEASUREMENTS FOR SALLY:
Click for larger image


Supplies Needed: (Sally)
PVC Pipe & Connectors
Foam Pipe Insulation (2 Sizes)
Air Dry Clay
Acrylic Paint
Wire (thin gauge)
Balloon
Yarn (in Sally's hair color)
News Paper
Great Stuff Expanding Foam
Felt (few yards)
Scissors
Hot Glue (Lots)
White Glue
Material (black and white stripe socks)
Sharpie Marker (black)

Supplies Needed: (Hands)
PVC Pipe
Pink Insulation Foam (chunks)
Wire (thin gauge)
Masking Tape
Soft foam
Plasti-Dip Spray (Plastic Coating)
Acrylic Paints


(Detailed description corresponds with picture tutorial above)

1. Find a reference picture. Find the scale, measurements and make a plan.
(or follow my measurements at the top of this page)

2. Sculpt Sally's face out of air dry clay. (craft or hobby store)

3. Paint Sally's face with acrylic (using a photo for reference). (Liquitex- Soft Body in "Light Blue Permanent" #770) Add shadows accents and details as needed.
Cut very small segments of small gauge wire (Home Depot) and glue them onto Sally's "seams" on here face. They should look like staples or stitches.
Face Sculpt     Click for larger image

4a. Blow up a balloon roughly the size of Sally's head. Paper mache' over the balloon to make the head leaving a 2" opening at the bottom. Once the paper mache' is dry pop the balloon. and fill the cavity with Great Stuff expanding foam. Let it dry/harden. Hot glue Sally's face to the head. Carve out a hole in the expanding foam in the bottom of the head big enough to put a 4" PVC pipe in. Leave about 1.25" sticking out of the head. This will hold/support the head onto the PVC frame.

Click for larger image

4b. Measure out the desired length of Sally's hair. Start cutting and hot gluing strings of yarn, placing them INDIVIDUALLY on her head. Time consuming...

Hair      Click for larger image

5. Construct the PVC body frame

6. Measure and cut the foam pipe insulation. The pipe insulation tubes have a slit running the length of the tube, so they can be opened up and fit over the pipes. This will be Sally's skin. Use the smaller diameter tube for her chest, and arms. Use the bigger diameter for her collar bones and legs. 
 a . To make the tube taper at her wrists, cut away some of the material at the slit and close the gap and glue it (making the diameter smaller). 
 b . To make her calves on her legs bulge out, wrap the pipes near her calves with masking tape, news paper or foam to build it out. This with give her legs shape. 
 c .  For the neck/chest, place the foam tube around the neck PVC pipe. Where the tube meets the collar bone cut horizontal slits on each side of the main vertical slit. This will open up and flatten it out for her chest area.
Neck & Chest      Click for larger image

7. Paint the foam insulation tubes to match skin (Liquitex- Soft Body in "Light Blue Permenant" #770). Add "stitches" to her skin with a black sharpie (use photo reference). Blue paint may need touch-ups each year after being packed away .

8. Lay Sally down on a large piece of felt to make a dress pattern. Pencil the dress shapeof the dress around Sally. Move Sally. Cut out The dress shape. Trace, and make a duplicate of the dress pattern, one front and one back.

9. Stuff Sally's chest and torso to give her a "womanly shape". I used a paper bag stuffed with news paper.

10. Fit the two dress pieces (front and back) to Sally's body. Hot glue or sew the dress together. Cut the V-neck shape into the front of the dress while its on her.
There maybe an easier way to do this, feel free to improvise...

11. Paint the patchwork pattern on to the dress. It was a lot easier, faster and cheaper for me to paint the quilt style dress, instead of sewing all the different material sections together.

12 Finishing touches:
 a. Shoes/Socks - I bought black and white striped legwarmers at the 99cent Store. I cut one in half and used it for both socks. I fit it around both ankles. I carved some shoes out of pink insulation foam and painted them black.
 b. Hands - 1. Cut out a piece of pink insulation foam. 2. Fit it onto a .5" PVC pipe. 3. Insert wire for fingers. 4. Masking tape fingers in place. 5. Cut soft foam (like the foam from a foam hair roller/curler) into finger size strips. 6. Pad the wire fingers with the squishy foam and  wrap them with masking tape. 7. Continue wrapping the rest of the hand with masking tape. 8. Spray hand with Plasti-dip plastic spray. this will give the hand a flexible protective coating. It goes on thin, you will need several coats.When it dries you should have a rubbery pose-able hand. 9. Paint hand with acrylic (Liquitex- Soft Body in "Light Blue Permenant" #770). 10. Fit hand onto PVC "wrist" and pose as desired...


(I just realized that I for got the stripes on her yellow sleeve, and the square patch on the front of her dress...oops)

Please comment if you have any questions... Good Luck.


Thursday, May 30, 2013

Jack's Chalkboard Christmas Equation: Nightmare Before Christmas DIY Prop Tutorial

 This is a tutorial on how to make a "chalkboard" prop. You can use this tutorial to make any faux chalkboard.

   I decided to make Jack Skellington's chalkboard from Nightmare Before Christmas. Its from the scene where Jack is trying to figure out what Christmas is. He draws out a long elaborate formula / equation as he tries to find the meaning of Christmas.


NBC MOVIE REFERENCE:

Supplies Needed:

-2 black foam-core poster boards (Dollar Tree)
-Exacto blade
-Hot glue
-Acrylic paint
-Printer
-Fake floral items (Dollar Tree or craft store)

Approx Cost: $5+
DIY PROP:


(Detailed tutorial corresponds with picture tutorial above)

1. Buy 2 black foam-core poster boards at dollar tree. $1 each :)

2a. Take one of the boards and trim some of the edges off with an exacto blade to make the board more "off kilter". There are no straight lines or right angles in the world of Tim Burton. (Example: If you look at the finished product photos, you can see that the left side of the chalkboard is a few inches taller than the right side).

2b. Take the second foam-core board and cut approx. 1" strips from it to make the "wooden" frame. I found out by accident that when you start cutting the foam-core into small pieces, the black paper actually peels off from the white foam center (thats why in the pictures it appears I used white material). When this happened, at first I thought, "awww crap"...but then it actually worked out better in the end. It ended up being easier to blend the paint on the foam vs the paper. 

3. Fashion the strips into a frame that fits the shape of your "chalkboard". Measure, cut mitered corners and tape the pieces together on the backside of the frame . 

4*. Paint : Prime the entire frame with an off white or cream color base. Next paint a thin, watered down coat of a "woodish" brown, let it dry. Next layer on a thick coat of liquidy dark brownish-black paint. With the dark top coat still wet, drag a wood graining tool across the surface to achieve a faux wood look. (They sell different types of wood graining tools, but for this project I made my own out of the same foam-core we have been using. Cut a small rectangle of foam-core, peel the paper off, and cut "v" shaped notches out of the edges with your exacto blade). With a continuous downward pulling motion twist the wood graining tool side to side . Repeat if necessary.


5. Hot glue the frame to the "chalkboard". You can also reinforce the mitered corners of the frame with hot glue .

6. I found an exact photo copy of Jack's Christmas formula put out by Disney/Touchstone:
I wanted my graphics to be EXACT. So...I saved this file to my computer, opened it in Adobe PhotoShop, and re sized the image to be the same measurements as my chalkboard (17"x 29"). Then I opened the re sized image in Windows: Paint. I printed the image from Paint at 100% size . It printed the image out exactly 17"x 29" on multiple pieces of paper. I cut and pasted the pages together. There may be a way easier way to do this but, I'm not aware of it. Sorry... Then I laid the image on the chalkboard and traced all of it with a pen. This ensured all of the graphics would have the exact size and placement.
(If you just want to wing it, and free hand all of the graphics, disregard the ramblings above)

7. Impressions/guide left behind from pen 

8. Paint : Follow along the impressions you made (or didn't make) using white acrylic paint.

9. The swirly top accent pieces were measured and drawn onto the excess of the second foam-core board. Then cut out with an exacto blade . The black paper peeled off again... Dry fit your swirlies to the top of the chalkboard.

10. Paint the swirlies. I did a base coat of black acrylic, then did some passes with watered down browns and golds to make it look like rusty metal.

11. Hot glue the swirlies to the back/top of the chalkboard frame .

12. Arrange and hot glue floral garland and holly leaves & berries to frame . Use the movie still photo for reference . You can also hot glue a hook to the back for hanging on the wall.

If you have any questions, please leave a comment.   Good luck...


Friday, May 24, 2013

PVC Candle Prop Tutorial

This is a tutorial is on how to make fake candles out of PVC pipes. They look great placed next to your NBC/Halloween props, and they are completely safe! You dont have to worry about burning the house down. This is how I Made them:

Supplies Needed                                                                                                           


1.5" x 2' PVC pipe (One pipe makes 2 or 3 Candles)
**To save money, cardboard paper towel rolls can be substituted for the PVC, but they will not be as sturdy, and may be crushed during storage**

1.5" diameter circles/discs cut from pink insulation foam 
(One for each candle)

Battery operated tea light candle for each candle
(3 pack/$1.00 @ Dollar tree)

Hot glue

White spray paint/Acrylic paint

Saw

Approx Cost: $10 or less

Time invested: 1.5 Hours


(Description corresponds with picture tutorial above)

1. Buy 1.5 inch x 2 feet PVC pipes* ( as many as desired) Cut the PVC into 2,3,4 Pieces. I was able to get 3 Candles of differing heights from one, 2 ft. segment. 
 1.5" diameter is the perfect diameter for the average tea light to fit perfectly.

2. Cut 1.5" diameter circles or discs out of foam. I used pink insulation foam since I had a ton left over from all my other projects. You can really use anything that will wedge snugly into the PVC pipe and create a shelf for the tea light. You can use expanding "Great Stuff" foam too, but its messy and takes much longer.

3. Buy battery operated tea lights. These are available at many stores, but I found a 3 pack for $1 at Dollar Tree.

4. Dry fit all the pieces together.

5. Once everything is perfectly fit, heat up the hot glue gun! Drip layers of hot glue all over the rim of the PVC pipe, try to simulate melting wax as best you can. You will go through lots of glue sticks during this project. (Dollar Tree sells packs of hot glue sticks! Pick some up while your getting the tea lights).

6. Spray paint the entire candle + hot glue drips white. 

7. After the spray pant is completely dry, give it a wash with a mixture of brown/black acrylic paint and water. let it settle in the cracks and discolor the bright white. This will give the candle an aged & antiqued look.

Comment if you have any question....  Good luck.

Thursday, May 23, 2013

Nightmare Before Christmas: Zero's Dog House Grave Stone Tutorial

This is a tutorial on how to make Zero's dog house from the movie Nightmare Before Christmas. In the movie, Zero is a ghost dog, so his home is, what else? A tomb stone in a grave yard! This is how I made it...


Supplies Needed:
                                                                                                         
Pink Foam Insulation - Home Depot
Caulk
Glue
Screws
Drill
Cardboard
Knife/Saw
Exacto Blade
Paint/Brushes

Approx. Cost: $15+

Time Invested: 4 Hours


Additional measurements and cutting visual aid:

Click to view enlarged image


(Description corresponds with picture tutorial above)

*1a. Step one is always look at a reference picture, get your scale, measurements & a plan.

1b. Cut two identical pieces of foam in the doghouse shape. This will give the dog house more depth by stacking the foam. You will cut the door  into the top piece, the second piece will only  show through the door cut out. Cut a Zero shaped head and cross bones from foam as well. Glue them together with caulk. Let it dry.

2. Cut cardboard to use for the roof. It should be slightly wider than the foam roof, and overhang ( like a real roof). Also use three cardboard strips to make the covering for the apex of the roof. Use screws and a drill to quickly and easily attach the cardboard to the foam roof.

3. There is also a 1" cardboard lip that runs the length of  the front edge of the roof (eaves). These were cut, dry fit, trimmed, and glued into place.

4. Use an Exacto blade and carve the name "ZERO" over the door opening.

5. Make roof shingles. To make shingles, cut a long strip off of the pink foam board about 2.5/3" wide.
Round two edges of the strip with a knife and sand them smooth,  making a horse shoe/domed strip. Now slice thin pieces off ( like slicing a loaf of bread). Repeat until you have enough shingles to cover the roof. Use a gob of caulk on each shingle and stick it too the cardboard roof. start at the bottom and overlap/stagger your way up the roof.  Use caulk to fill any holes or unwanted gaps that are visible.

6. Sand any imperfections on house with a fine sandpaper.

7. Patch any holes, imperfections, & seams in the foam with caulk

8. Cut a cross from foam, and sand it a little. Attach cross. You can use glue. I was able to screw upward through the roof overhang into the cross making it very sturdy.

9. Prime. I used flat grey interior wall paint that was in the garage.

10. -Paint black details ("ZERO" , door opening, Zero's eye sockets).
      -Paint roof with a wash of black paint and water ( may need two coats)
      -Using a dry brush technique, age and antique the rest of the dog house so it doesn't look so bright
      and new.

Comment if you have any questions... Good luck.


Pin It button on image hover